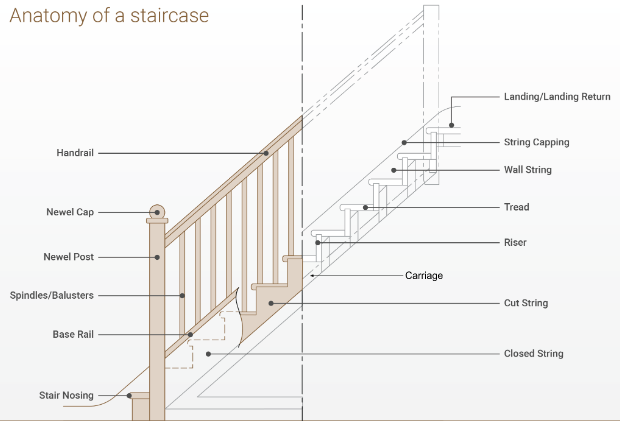
During the last two projects we have worked on, we encountered various staircase scenarios that required different approaches. It’s always a good idea to know your options and the labor involved before you replace or restore a staircase. Let’s look at what makes up a staircase first.
Below is a great outline of the components of a staircase from the Salisbury website.
REBUILDING THE STAIRS
Removing four stories of stairwells, and rebuilding the entire structure is not for the faint at heart. Fortunately having a master stair builder allows you to sleep a little better at night. We rebuilt the carriage (the support beam under the steps that runs the entire length and connects to the header of the landing) and stringers. 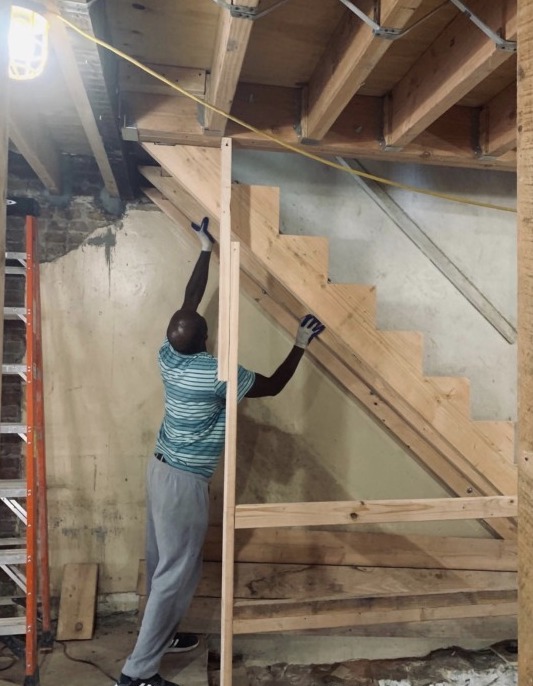 This was done during the joist replacement and we installed temporary risers and treads for the duration of the project, which added considerable cost. We could have waited to do this later in the project, however given the instability of the old stairwells, they would not have sustained the stress of the gut renovation.
One distinctive challenge was getting the curved wall stringer, to match the original curved wall. Douglas fir joists, which must be heavy enough to support the stairs, have to be split and bent to the form of the wall stringer. When the finished stairs were installed we used beautiful reclaimed vertical pine risers and treads from Provenance Floors, who also milled the floors for us.
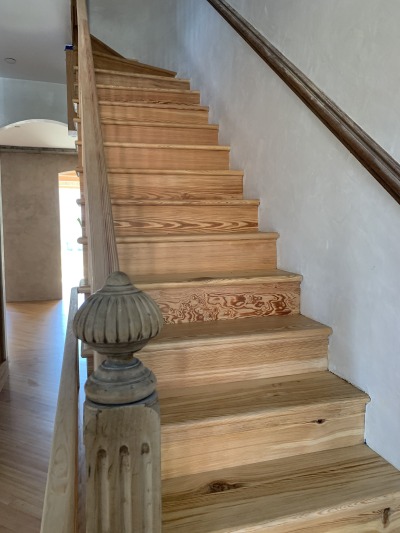 On the upper floors, we used vertical grain, new pine treads and risers. We chose to end the bullnose with a return on the side which initially seemed unfinished but when once the balusters and banister tied into the stair, it all worked out perfectly.
At the parlor level we installed half inch reclaimed pine panels from MMFine. They also milled all the baseboards and closet shiplap. On upper floors we were going to install douglas fir panels, however once the stairs were installed we found the raw lumber douglas fir beams looked great and we left it raw. All the stairwells were finished with Bona Matte finish.
The ordering of milled lumber occurred both before and after the Covid shut down and prices of lumber increased upwards of 30%, which challenged our entire budget, but in the end it has been all rewarding.
RESTORING THE STAIRS
Our current stairwell has original treads and risers under the old linoleum. This beautiful old wood will need to be stripped, sanded and repaired. Once the linoleum is removed, we have to scrape each riser and tread to remove the adhesive down to the wood. Then each riser and tread has to be sanded by hand. This process, while laborious, will be less costly then replacing all the treads and risers and will add to the true character of the house.
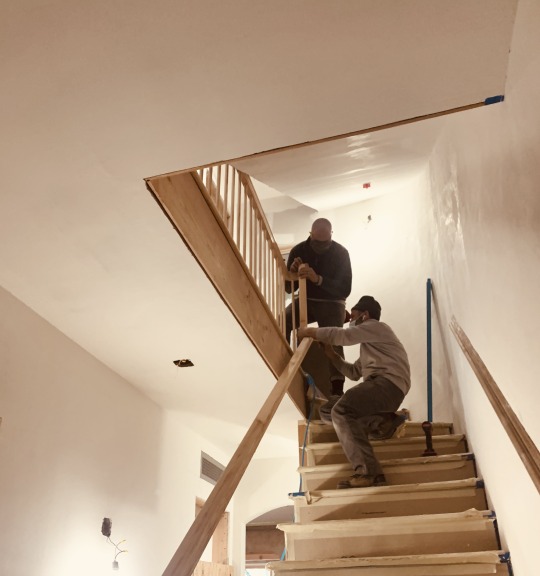 The stairs needed to be shored up, which can be done as one piece, making it much less labor intensive than tread replacement. Shoring up the stairs involves jacking up the sagging stringer and landing. Then holding it in place while a new or adjusted support beam (which runs below the stairs treads and risers) is installed correctly. As well as a new header and the landing frame. Treads and risers may need to also be put back into place where they slid out of the baseboard framing on the brick wall.
While the stairs will need to be shored up, it will be done as one piece, much less labor intensive than tread replacement. Quality treads and risers are incredibly expensive currently so repairing existing stairs if possible is the better scenario. A few coats of polyvine sealer in a matte finish and a beautiful runner and we are good to go.
If you are looking for advice in any part of evaluating a fixer upper, please feel free to contact me for resources and assistance at townhousetherapytati@gmail.com or call (917) 697-0117.